This document serves as the main landing page for Alliance Import Profile documentation. It contains scope notes, some basic “dos” and “don’ts”, and things to consider before configuration. Tabs documenting specific import profile configuration settings are also provided.
Import profiles in Alma are used to add and/or update bibliographic and inventory records in batches, using an input file of MARC metadata. Import profiles are particularly helpful during the Acquisitions process, and for the ongoing management of e-resources collections. Alma’s import profiles are very flexible in terms of what they allow you to do. This flexibility, however, stems from a complex suite of configuration options, and figuring out how to set up an import profile to do what you want without causing issues in the Alliance Network Zone can be challenging.
Dos and Don’ts
- DO take some time to review your input file and think about the guidelines below to prepare for configuring your import profile.
- DO consult Ex Libris’s documentation to get familiar with the basics of how to create and edit import profiles. See:
- DO avoid creating duplicate records or overlaying a record with a different OCN in the NZ.
- DO test your profile on a small set of 1-5 (preferably problematic) records before loading a large file.
- DO ask questions on the TS discussion list or contact the TS PM if you’re unsure of anything.
- DO feel free to share profiles with the Community Zone.
- DON’T assume that an existing import profile is using the settings you want. Always check the profile configuration before using it!
- DON’T assume that metadata provided by a vendor has properly-qualified identifiers or good-quality metadata. Use a tool like MarcEdit to check your input file before importing.
- DON’T use the NZ for Update Inventory profiles. These profiles use vendor IDs from the POL to find matching records, and can cause bad overlays in the NZ if the vendor chooses a different OCN for the resource after the brief record is delivered and before the full record load arrives.
- DON’T use the “Do not override/merge a non-brief record with a brief version” setting. (Note that the linked policy needs re-testing and review.)
Things to consider before starting
Are you restricted from sharing the metadata?
Most records can be shared with the NZ since all Alliance members have OCLC memberships. However, some vendors do not allow the sharing of their metadata with other institutions that are not customers. Check with your vendor for any metadata sharing restrictions. If you’re not allowed to share the metadata, then you should load the records to your IZ and NOT link them to the NZ.
Are the records from OCLC, or from an external vendor?
OCLC provides up-to-date records with reliable control numbers. Other vendors may provide less accurate identifiers and data that’s outdated. Vendors vary in metadata quality, so it’s always recommended to review their data for problems before you configure your import profile.
Do you need to create inventory, or not?
You can create inventory for electronic or physical resources using import profiles. However, you’ll need to consider different things for each type. For example, electronic inventory should either be attached to a CZ collection or a local collection for ease of future management. Physical inventory may need to be updated with barcode information and other data from your standing order vendor using an IZ import.
Are identifiers present in records? Which one(s)? Are they consistent?
The OCLC control number is the most precise matching identifier that you can use in the NZ, and imports to the NZ should use the “Unique OCLC Number” match point whenever possible.
- If your records have inconsistent OCLC numbers, you can load them to the NZ using a multi-step process to avoid bad overlays and duplicate record creation or, in some cases, load them to your IZ instead. See the Alliance policy on this scenario for more details.
- If your records have no OCLC numbers, but have consistent vendor IDs in the 035, you can load them to the NZ matching on the 035 field and using the “Use NZ record” operation or “OCA Bib Merge (Keep 035s)” merge method on match.
- If your records don’t have OCLC numbers or consistent vendor IDs, you should load the records to your IZ and then link to the NZ (once you have added OCLC numbers) instead of loading directly to the NZ. Aside: It is hoped that this level of inconsistency in record identifiers is rarely encountered with incoming record sets.
Are the records you’re importing old or new records?
If you’re loading bib records that are not up-to-date with their WorldCat counterparts, your import should not overlay the NZ bib on finding a match. Instead, it should “Use NZ Record” or use the “OCA Bib Merge (Keep 035s)” merge method on finding a match. Daily update loads from WorldCat to the NZ keep the existing NZ records more current than any records you’re likely to get from a non-OCLC vendor.
Are there any local fields to add?
The best way to add local fields to newly-imported records is to create a set of the records after import and use an Alma normalization rule to add a local Bibliographic extension. Alliance documentation on local fields provides more detail on adding local bibliographic extensions in Alma.
Are there any data issues to correct before or during import?
If your incoming records have data that needs correction, the best steps to take to resolve the problems are to:
- Reach out to the vendor to ask for the corrections,
- Configure data modifications for the collection in WorldShare Collection Manager (if applicable),
- Configure an Alma normalization rule and an Alma normalization rule process that can be used by your import profile to correct the data (Ex Libris: Editing an Import Profile: Normalization and Validation), or
- Use a tool like MarcEdit to make the needed changes prior to Alma import.
Are you loading the records to your IZ or to the NZ?
In general, it’s preferable to use the NZ for record loading unless:
- You are restricted from sharing the metadata by the vendor who provides it,
- The records you’re importing have unreliable identifiers,
- The records you’re importing have questionable metadata, or
- You’re running an “Update Inventory” profile.
Configuring Import Profiles
Alliance documentation focuses on New Order and Repository import profiles. Future additions and revisions to this documentation may address other import types, as their use becomes more widespread within the Alliance.
Important: Update Inventory profiles should NEVER use the NZ. These profiles use vendor IDs from the POL to find matching records, and can cause bad overlays in the NZ if the vendor chooses a different OCN for the resource after the brief record is delivered and before the full record load arrives.
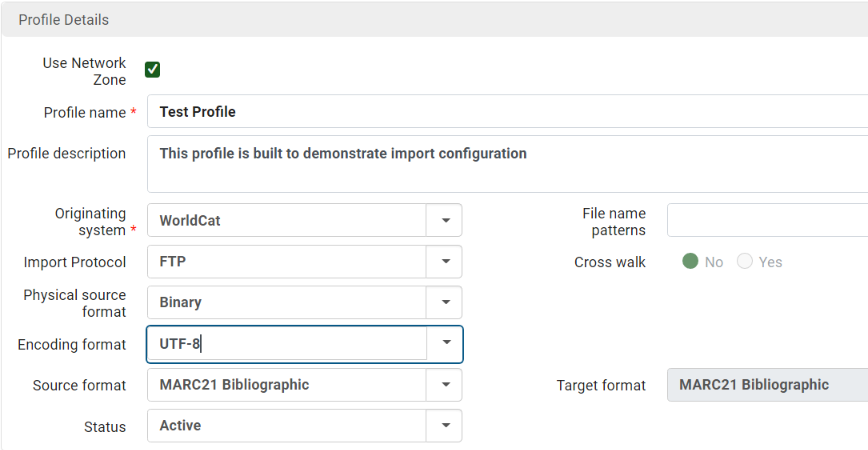
This tab contains basic information on the context for the import (IZ vs. NZ) as well as settings that define how the profile will access the input file and what data format that file will be in. This is also where scheduling can be configured, in the case of a profile that is set to run automatically on a regular schedule.
Note that * indicates a mandatory field.
Profile Details:
- Use Network Zone checkbox:
- Checked
- *Profile name
- Description:
- This field is optional, but can be a useful place for notes about the profile’s use.
- *Originating System:
- For New Order and Update Inventory profiles, select your vendor. For GOBI, this is YBP Library Services.
- For Repository profiles, select the source of the metadata. This could be a vendor, but can also be a system like WorldCat.
- File pattern:
- If you use FTP so that Alma can automatically retrieve files, setting this up will help the import profile ignore files without the right naming pattern. Work with your data vendor or the FTP server administrator to determine how your input files will be named, and set the pattern based on that.
- For example, most GOBI files start with a number and end with “.ord”, so if the number always starts with consistent digits “XX”, you can set a pattern like “^XX****.ord”. That means “Look at the start of the filename for digits XX followed by four wildcards and then .ord.”
- Import protocol
- Upload: Use this setting if you are going to manually upload a file every time you run this import profile. No scheduling is possible with this option.
- FTP/SFTP: Use this setting if the vendor is going to drop off files for you on a secure server and you want Alma to go look for new files automatically according to a schedule.
- Crosswalk:
- No.
- Physical source format:
- Binary (.mrc) This option is useful if you’re doing record edits using MarcEdit or a similar tool prior to import, or receive files in .mrc format from a vendor.
- Delimited Text File (.txt): This is a useful option for some cases, for example, if Acquisitions is creating many orders at once for a non-Gobi vendor.
- Comma – This option is for CSV files that contain comma-separated values. (Documentation on importing with CSV files)
- Tab – This option is for TSV files that contain tab-separated values.
- Excel (.xls, .xlsx): This option, similar to delimited text, can be used to load records using a less structured format than MARC binary or XML.
- Note that members report Excel loading can be a bit finicky, so if you have trouble with this option, try using Delimited text instead.
- Documentation on imports using Excel files
- Marc XML (.xml): This is a good option when vendors provide data in MARC XML format, or if you’re more comfortable editing records in MARC XML.
- Encoding format (only shows when physical source format = binary) – Always use UTF-8
- Source format – MARC21 Bibliographic
- Target format – MARC21 Bibliographic
- Status – Active
Scheduling: (FTP import protocol only)
- Files to import – Choose “New”. This keeps Alma from re-retrieving files that have already been imported but are still on the FTP server.
- Scheduler status – Active
- *Scheduler – Pick an option from the available times that suits your vendor’s drop-off schedule and your desired import frequency.
- Email notifications – Use this button to set up email notifications to staff members when the import profile runs.

FTP Information: (FTP import protocol only)
You’ll need to work with your vendor to fill out this information. You could send them a screenshot of this section of the configuration so that they know what you need, but most vendors will send you this information when they set up your FTP access.
If you already have an FTP server configured for this vendor/data source, you can select the “Select from configured FTP” option and choose that FTP server from the list in the “S/FTP Connection Type” field, as shown here. If you use this option, you’ll need to specify the directory on the server where your input files are placed.
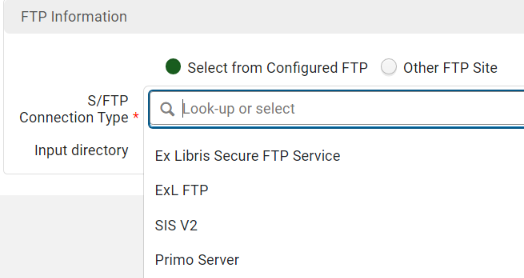
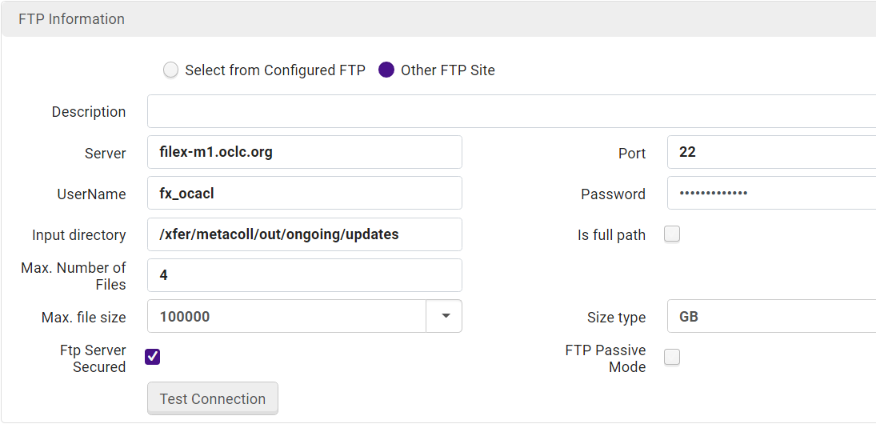
If you need to set up a new FTP configuration for your vendor/data source, choose the “Other FTP Site” option and enter the following information.
- Description – This can be a nice place to tuck any notes about the FTP setup, if needed.
- Server – Get this from the vendor. It will look something like ftp.ybp.com.
- Port – Get this from the vendor. The vendor may not need you to use a specific port, and it’s ok if this is blank.
- Username – Get this from the vendor.
- Password – Get this from the vendor.
- Input directory – The vendor will advise you on this. It’s the folder in your “area” of the FTP server that contains your new order records. Don’t enter a leading slash here – just the name of the folder. (e.g., “orders”)
- Is full path? – No.
- Max number of files / Max file size / Size type:
- Use these to set limits on how big the imports can be.
- Usually 10 files of up to 1000 MB each is sufficient for routine imports. However, if you import on a weekly or monthly basis, you might want to increase these limits.
- FTP server secured – Get this from the vendor.
- FTP passive mode – Not checked
Finally, use the Test Connection button to ensure that you can connect to the FTP server. If you have any trouble, make note of the error message you get from Alma and contact the FTP server administrator for help.
Ex Libris Documentation:
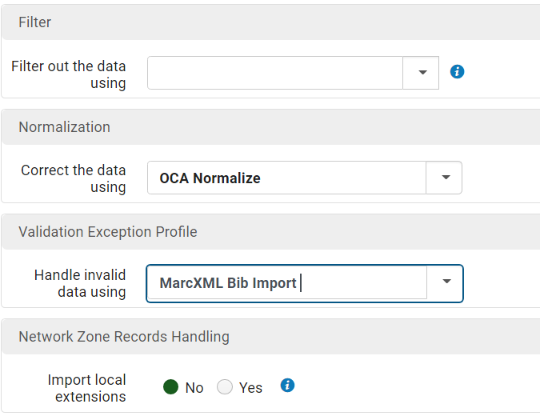
This tab is where you configure any rules you want to use to filter records out of your import or change the record data during the import.
There are no mandatory fields on this tab.
Filter
Filter out data using:
- If you have an Alma indication rule set up to identify records you don’t want to import (e.g. records with a non-English language of cataloging), you can specify that rule here to keep the profile from loading them.
- Any records that were not loaded due to a filter will be shown in a separate line of the import job report.
Normalization
Correct data using:
- If the data from the vendor needs to be altered as it comes into Alma, you can configure an Alma normalization rule and a normalization rule process to make those changes. If you do this, specify the normalization rule process here.
- Examples: For New Order profiles, you may wish to remove the vendor-supplied EOD present in the 9XX fields. For repository profiles loading records from WorldCat, you should remove the 029 fields.
Validation Exception Profile
Handle invalid data using:
- MarcXML Bib Import is the default, and you should leave that in place.
Network Zone Records Handling
Network Zone Records Handling:
- No.
- Ex Libris’s documentation on this feature leaves many questions unanswered, and without comprehensive testing, this is not a feature that is currently sanctioned for use by Alliance members. If you’re interested in testing this, please contact the Tech Services Program Manager!
Ex Libris Documentation:
This tab is where you configure “What counts as a match?” and “What happens when there’s a match?” for your import profile. Most of the real action of importing happens based on this tab’s settings.
Since choices made here can have unforeseen circumstances, the best approach is to carefully consider the quality and age of your incoming records and their identifiers while filling out this tab, and to test your import profile on a small number of input records before running a full import load.
Note that * indicates a mandatory field.
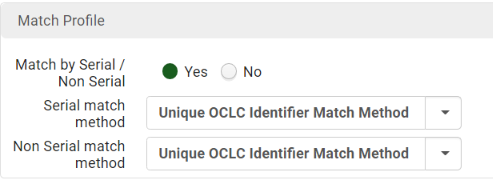
Match Profile
- *Match by Serial / Non Serial:
- Yes. This allows the profile to be used for both types of resources.
- Serial match method (Serial and Non-Serial):
- Choose between:
- “Unique OCLC Identifier Match Method” is the preferred match method for NZ imports.
- “035 Other System Identifier Match Method” is the second-most precise match point, and should be used if OCNs are not present in the incoming records.
- ISXN/024/035 Match Method is allowed for use if OCLC numbers and vendor IDs are not present in the 035. This is not a precise match point, so profiles using this match method should NEVER overlay the NZ bib. (See below)
- Choose between:
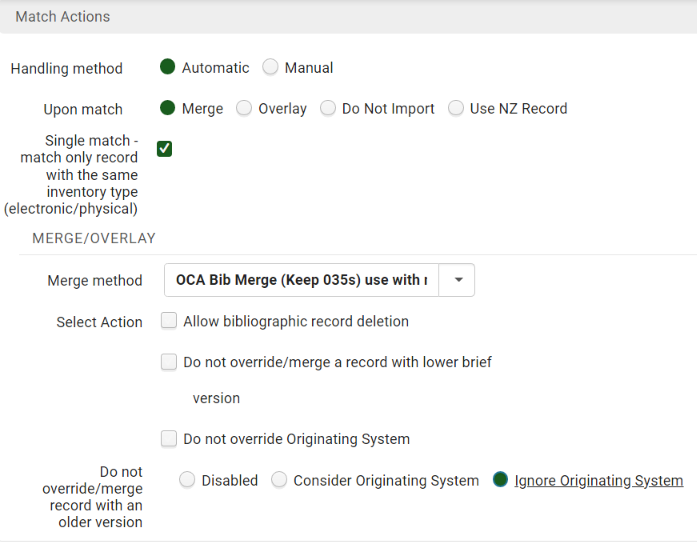
Match Actions
- *Handling method:
- Choose between:
- Automatic: Alma will automatically use the NZ record or merge records based on your chosen “upon match” action below. (preferred)
- Manual: If a match is found, the import process requires you to manually choose whether or not to import the record before the process can complete. (not recommended)
- Choose between:
- *Upon match:
- Choose between:
- Use NZ record: This is the preferred action, and will attach POL and inventory to the existing NZ bib, and link the NZ bib to the IZ. No other data from the record in the input file will be added to the NZ bib.
- Merge: This is the second-most preferred action. It allows you to select a merge rule (See “merge method” below) that will cause some of the data from your input record to replace data in the NZ record.
- Overlay: Do not use.
- Do not Import: This option can be used if you just want to run an import to see what records match your input file without taking any action.
- Choose between:
- Single match checkbox:
- Yes
- This makes Alma consider the inventory type when identifying matching records.
- *Merge method:
- Choose between:
- Keep only old value: Use when “Upon match” is set to “Use NZ Record”.
- OCA Bib Merge (Keep 035s): This merge rule adds ONLY 035s (other system IDs) and 979s (Boundwith markers) from your incoming record to the existing NZ record if a match is found. Other data from your incoming record is discarded. (preferred)
- OCA Bib Overlay (Keep 035s): This merge rule replaces ALL data in the NZ record with the exception of MARC 001 (MMS ID), 979 (Boundwith marker), and any non-OCLC 035s (vendor IDs) with the data from the incoming record. This should not be used if you are using the ISXN/024/035 match method. (See above)
- Choose between:
- Allow bibliographic record deletion:
- This may be used in cases where you are importing ebook records, and wish to use the import to delete portfolios from your collection.
- Do not use for imports of physical resources.
- See the Alliance policy on NZ bib deletion for more details.
- Do not override merge w/ lower brief version:
- Do not use.
- See the Alliance policy on this setting for more details.
- Note that this policy needs re-testing and review. If you’re interested in helping to test, please contact the Tech Services Program Manager.
- Do not override Originating System:
- Do not use.
- This option would prevent the import process from replacing the originating system in cases where a record is merged/overlaid. This is not desirable, as the originating system value can be a helpful audit marker if the NZ record has been edited by an import process.
- Community Zone linked records handling: (appears only if the ignore_cz_records customer parameter is set to false)
- Choose between:
- Update Community Zone record with local extensions: Does not appear for import profiles using the NZ.
- Skip record: When this option is selected and the matching bibliographic record is a Community Zone-linked record, the record is skipped. That is, no update is performed. When the profile is configured to skip CZ matches, but no match was found, the bibliographic record and the portfolio are created locally. If no match is found in the Network Zone, no matching attempt is made within the Community Zone.
- Unlink record from Community Zone and create a local record: When this option is selected and the matching bibliographic record is a Community Zone-linked record, the record is unlinked from Community Zone and a local copy is created at the institution level (no Community Zone cached copy is created). Any updates are performed on the newly created local record.
- Choose between:
- *Do not override/merge record with an older version:
- Choose between:
- Disabled: Alma does not take the incoming/existing records’ MARC 005 timestamps into account.
- Consider Originating System: Alma does not overlay or merge an older record with a newer record if the Originating System value in the existing record and the imported record are the same and the Originating System Version date in the existing record is newer than the date in the 005 field of the imported record.
- Ignore Originating System: Alma does not overlay or merge an older record with a newer record if the Originating System Version date in the existing record is newer than the date in the 005 field of the imported record. The value of the Originating System field is ignored.
- Choose between:
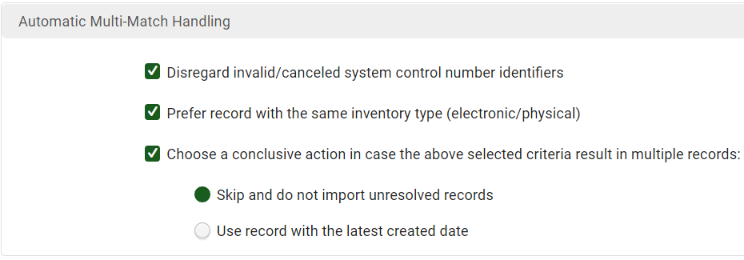
Automatic Multi-Match Handling
- Disregard matches for CZ-linked records: (appears only if the ignore_cz_records customer parameter is set to false)
- If selected, Alma will disregard CZ record matches.
- If not selected, Alma will consider CZ records valid matches.
- Disregard invalid/canceled system control number identifiers:
- Yes.
- This prevents multi-match errors when your incoming record has an 035$z value that matches an existing 035$z or 035$a in the Network Zone. The incoming record will match using its 035$a value only.
- Prefer record with the same inventory type:
- Yes.
- This can help Alma determine a match based on whether your incoming records’ inventory type matches inventory on an Alma NZ record (currently only ebooks).
- Skip and do not import unresolved records:
- Yes.
- This prevents the import of records that had a multi-match error during import and lets you review them using the Import job report instead of having to use the Matching section of the Resolve Import Issues page to resolve them immediately.
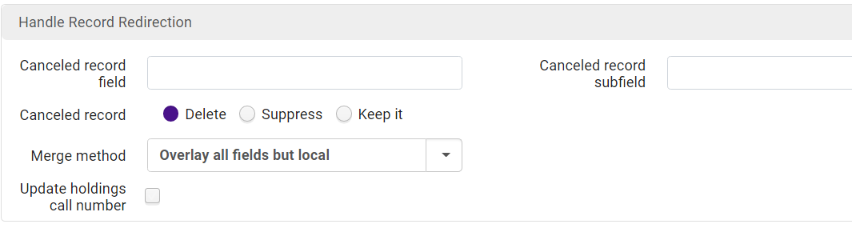
Handle Record Redirection
This feature is not sanctioned for use in the Alliance Network Zone because it has not been thoroughly tested. Ex Libris documentation on the feature is unclear on which records are merged and/or deleted by this feature, and their notes suggest that in cases of multi-match on an 035$z (which are the bulk of cases where we might find the feature useful), no merge will occur. Please leave the settings in their default state as outlined below.
- Canceled record field – Leave blank
- Canceled record subfield – Leave blank
- Canceled record – Delete (default)
- Merge method – Overlay all fields but local (default)
- Update holdings call number – No
No Match
- *Upon No match:
- Choose between:
- Add to NZ (most common setting)
- Do not import (Use this for multi-phase imports where the unmatched records from one import are used as input for a second profile with a different match method.)
- Import to IZ (useful for editing the record and linking it to the NZ later)
- Choose between:

Ex Libris Documentation:
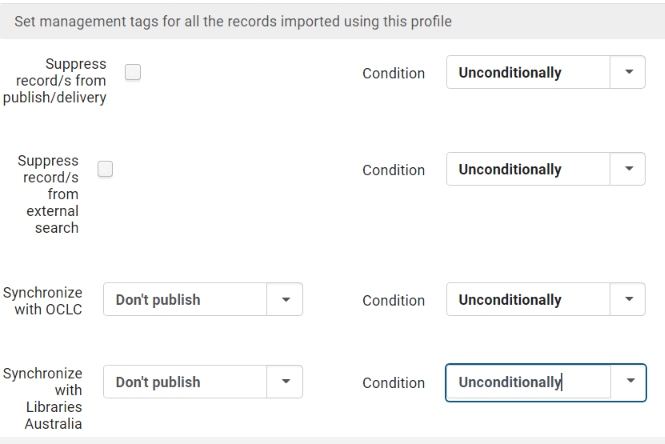
This tab contains configuration options that allow you to set bibliographic-level management tags for each record imported by the profile.
There are no mandatory fields on this tab.
Set management tags
- Suppress record/s from publish/delivery:
- No, unconditionally.
- Suppressing records in this way prevents them from being sent to Primo.
- Suppress record/s from external search:
- No, unconditionally.
- Suppressing records in this way can suppress them at the NZ level, which is not allowed.
- Synchronize with OCLC:
- If your institution uses an out-of-the-box Alma publishing profile to publish bib/holdings data to OCLC, use this setting to set the publishing tag either unconditionally or only for new records.
- Choose between:
- Don’t publish
- Publish holdings only
- Publish Bibliographic records
- Synchronize with Libraries Australia:
- Don’t publish, unconditionally
Ex Libris Documentation:
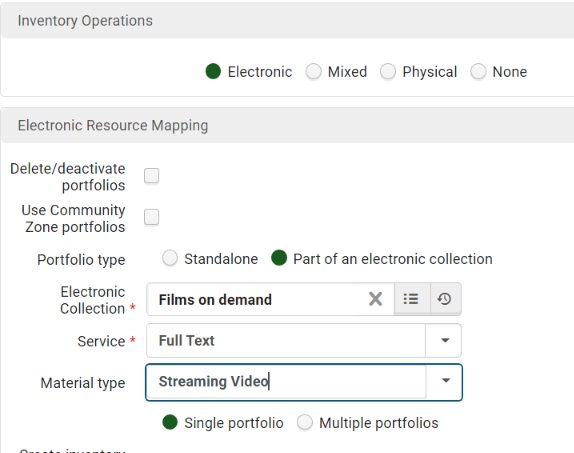
This tab contains the settings that tell Alma how to create inventory from the records in your input file. If configured, you will use the fields on this page to define which MARC fields and subfields in your input file contain your Alma inventory data.
Note that * indicates a mandatory field.
Inventory Operations
*Choose between:
- Electronic
- Mixed
- Physical
- None – Use this if you do not want to create inventory based on your input file.
Alliance Guidance
Very few inventory settings are suggested by the Alliance, as members have autonomy in how they create inventory that resides in their IZs. However, if you are creating electronic inventory, there is an Alliance best practice that portfolios should either be part of a CZ collection or part of a local electronic collection. If you are using a local electronic collection, make sure that it is set up before you configure your import profile.
In addition, if you are working with electronic inventory (ebooks in particular) and have selected the “Allow bibliographic record deletion” option on the Match Profile tab, then you can use the option on this tab to “Delete/Deactivate portfolios”. This can be useful in cases where you’re processing a set of records accurately marked for deletion (LDR:05=d) by the vendor. Note that not all vendors provide reliable delete files, so check to make sure you trust the data before using this setting. Choosing to “delete the bib record” via this configuration option will actually unlink your institution’s bib from the NZ before deleting it, so it’s safe to use.
Inventory Mapping and Holdings Record Mapping
A set of inventory information mapping options will appear based on your selection of electronic, mixed, or physical inventory type. Full details of all of the options for each inventory type are provided in Ex Libris’s documentation below. The documentation page also provides information on configuring the Holdings Record Mapping section.
Ex Libris Documentation:
This tab contains the settings needed for Alma to create POLs for your imported records when using a New Order or Update Inventory profile type. The POL data is taken from the incoming records (based on the fields you enter in the EOD Mapping section) and from fixed data points that you enter in the EOD General Parameters section.
EOD General Parameters and EOD Mapping
The fields on this page help you instruct Alma where to find the EOD data embedded in your input records. Full details of each field are provided in Ex Libris’s documentation below.
If you select the “Map Owner” and/or “Map Funds” checkboxes on this tab, you will need to save the profile and then edit the profile to specify what codes in the incoming data map to which Libraries/Funds on the Mapping Tab.
Note: Based on a note in the Ex Libris documentation, “when the use_network_zone parameter is set to ‘Yes’, the import profile does not create PO lines. This will be fixed in the upcoming releases.”
Ex Libris Documentation:
- Editing an Import Profile: PO Line Information
- Managing Import Profiles: Configuring the Update Inventory Profile
Important: Update Inventory profiles should NEVER use the NZ. These profiles use vendor IDs from the POL to find matching records, and can cause bad overlays in the NZ if the vendor chooses a different OCN for the resource after the brief record is delivered and before the full record load arrives.
This tab is where you can enter fund and location codes found in the incoming file and map them to your Alma libraries. This allows your New Order and/or Update Inventory profile to correctly assign the fund and owning library to the POLs created during the import.
There are no mandatory fields on this tab.
Fund Mapping
If you selected the “Map funds” checkbox on the POL tab during profile setup, you should save the profile, then edit it to complete the fund mapping section of this tab.
- Source Value = fund identifiers from the incoming file
- Fund = corresponding fund in Alma
Location Mapping
If you selected the “Map owner” checkbox on the POL tab during profile setup, you should save the profile, then edit it to complete the fund mapping section of this tab.
- Source Value = owning library identifiers from the incoming file
- Location = corresponding library in Alma
There is existing Alliance documentation for some vendor and scenario-specific imports:
- Marcive records for GPO resources (February 2014)
- WorldCat Cataloging Partners – includes shelf-ready (September 2016)
- YBP EOCR and EOCR+ loads – Approval Plan records (September 2016)
- YBP EOCR and EOCR+ loads – Brief Order records (September 2016)
- Vendor loads without consistent OCLC numbers (December 2020)
- Per this document, load Films on Demand records to your IZ instead of the NZ.